'%20fill='url(%23cc-green)'%20stroke='url(%23cc-green)'%3e%3cpath%20d='M60%20102h44l70%20112'%20fill='none'%20stroke-width='38'%20stroke-linecap='round'%20stroke-linejoin='round'/%3e%3crect%20x='142'%20y='128'%20width='328'%20height='212'%20rx='76'%20stroke='none'/%3e%3cpath%20d='M388%20300l62-24%202%2072z'%20stroke-width='20'%20stroke-linejoin='round'/%3e%3ccircle%20cx='222'%20cy='410'%20r='32'%20stroke='none'/%3e%3ccircle%20cx='372'%20cy='410'%20r='32'%20stroke='none'/%3e%3c/g%3e%3c/svg%3e) ChatCart
ChatCart
Start here Step 4 of 8
Quick start
Follow these steps in order. They take about 15 minutes. Each step says what you should see, so you know it worked. If something goes wrong, look for the message in Troubleshooting.
Unzip the download
Unzip the file from CodeCanyon into a folder you can find again, for example your
Documents folder. You get a folder named chatcart with the app in a
second chatcart folder inside it. See the folder tree in
What is in the download.
Open a terminal in the inner folder
Open a terminal and go into the app folder:
cd path/to/chatcart/chatcart-
macOS: open Terminal, type
cd(with a space), drag the innerchatcartfolder into the window, and press Enter. -
Windows: open the inner
chatcartfolder in File Explorer, click the address bar, typecmd, and press Enter. -
VS Code: choose File, then Open Folder, and
pick the inner
chatcartfolder. Then open Terminal, then New Terminal.
Check that you are in the right place. Type ls (macOS, Linux, PowerShell) or
dir (Windows Command Prompt). You must see package.json in the list.
Check your Node.js version
node -v
You should see v20.19.0 or a higher number, such as v22.12.0. If the
command is not found, or the number is lower, install Node.js 22 LTS from
nodejs.org, then close and open the terminal again. If you use
nvm, run nvm install 22 and then nvm use 22.
Install the packages
npm install
This downloads the packages into a new node_modules folder. It takes 1 to 3
minutes. Lines that start with npm warn deprecated are normal. The last line says
added ... packages.
You can also use npm ci. It installs the exact versions in
package-lock.json and is the best choice on a server. For your own computer, both
work.
Get a MongoDB database
ChatCart keeps its data in MongoDB. You need a connection string (also called a URI). Pick one:
-
MongoDB on your computer. The string is
mongodb://127.0.0.1:27017/chatcart. -
MongoDB Atlas (free, in the cloud). The string looks like
mongodb+srv://USER:[email protected]/chatcart?retryWrites=true&w=majority.
Not sure how? Set up MongoDB shows both options step by step.
Create your .env.local file
Copy the example settings file. Use the line for your system:
cp .env.example .env.local            # macOS and Linux
Copy-Item .env.example .env.local     # Windows PowerShell
copy .env.example .env.local          # Windows Command Prompt
Open .env.local in a text editor and set these values:
| Variable | Required | What to put there |
|---|---|---|
MONGODB_URI |
Yes | Your connection string from step 5. |
JWT_SECRET |
Yes | A long random text that protects logins. At least 16 characters, 32 or more is better. Replace the example value. Make one with a command below. |
APP_URL |
Recommended |
The address of your store. Use http://localhost:3000 for now. On your server,
use your real address, like https://shop.example.com.
|
Make a random JWT_SECRET with one of these commands:
openssl rand -base64 32

# or, on any system with Node.js (works on Windows too):
node -e "console.log(require('crypto').randomBytes(32).toString('base64'))"
Your .env.local now looks like this (with your own values):
MONGODB_URI=mongodb://127.0.0.1:27017/chatcart
JWT_SECRET=paste-the-random-string-from-the-command-above
APP_URL=http://localhost:3000.env.local later, stop the app
(Ctrl + C) and start it again.
Create your admin account (pick one path)
This step is not optional. Without it there is no account to sign in with. Choose one path. Admin account and demo data explains both in more detail.
Path A: try it with demo data
npm run seed
Loads two demo stores with products, orders and reviews, and creates the demo login
[email protected] with the password ChangeMe123!. It only runs
on an empty database.
Path B: start clean for your shop
npm run create-adminAsks for your name, email and password, and creates your owner account. There is no demo data and no store yet. You create your store in step 9.
.env.local before you
run the seed, and both demo stores use it: SEED_WHATSAPP_NUMBER=+15551234567 (use
your own number).
Start the app
npm run dev
Wait until the terminal shows Ready. Then open these addresses in your browser:
- http://localhost:3000: the storefront
- http://localhost:3000/admin: the admin
The first visit to each page is slow (10 to 30 seconds), because the page is built the first time you open it. After that it is fast. Keep the terminal open while you use the app. See A successful start for what you should see.
Sign in and set your WhatsApp number
Orders go to the store's WhatsApp number. Set your own number before you test an order, or the test goes to a placeholder number.
Path A (demo data)
-
Sign in at
/adminwith[email protected]andChangeMe123!. - Change the password: Users, edit Demo Owner, type a New password, and save.
- Go to Settings, tab General, field WhatsApp number. Type your number and save.
- The demo has two stores. Use the store switcher at the top left to choose Aroma Café, and set the number there too.
Path B (clean install)
- Sign in at
/adminwith the email and password you chose. - The dashboard says No store yet. Click Create a store.
- Click New store. Fill in the name, the mode, your WhatsApp number, the currency and the language. Turn on Default store, then click Create store.
- Add categories and products. See Managing products.
How to write the number: the full international number, with the country code
and without the first 0 of a local number. For example, the US number (555) 123-4567 is
+15551234567, and the UK number 07700 900123 is +447700900123. Spaces,
brackets and a leading + are fine: ChatCart keeps only the digits for the WhatsApp
link.
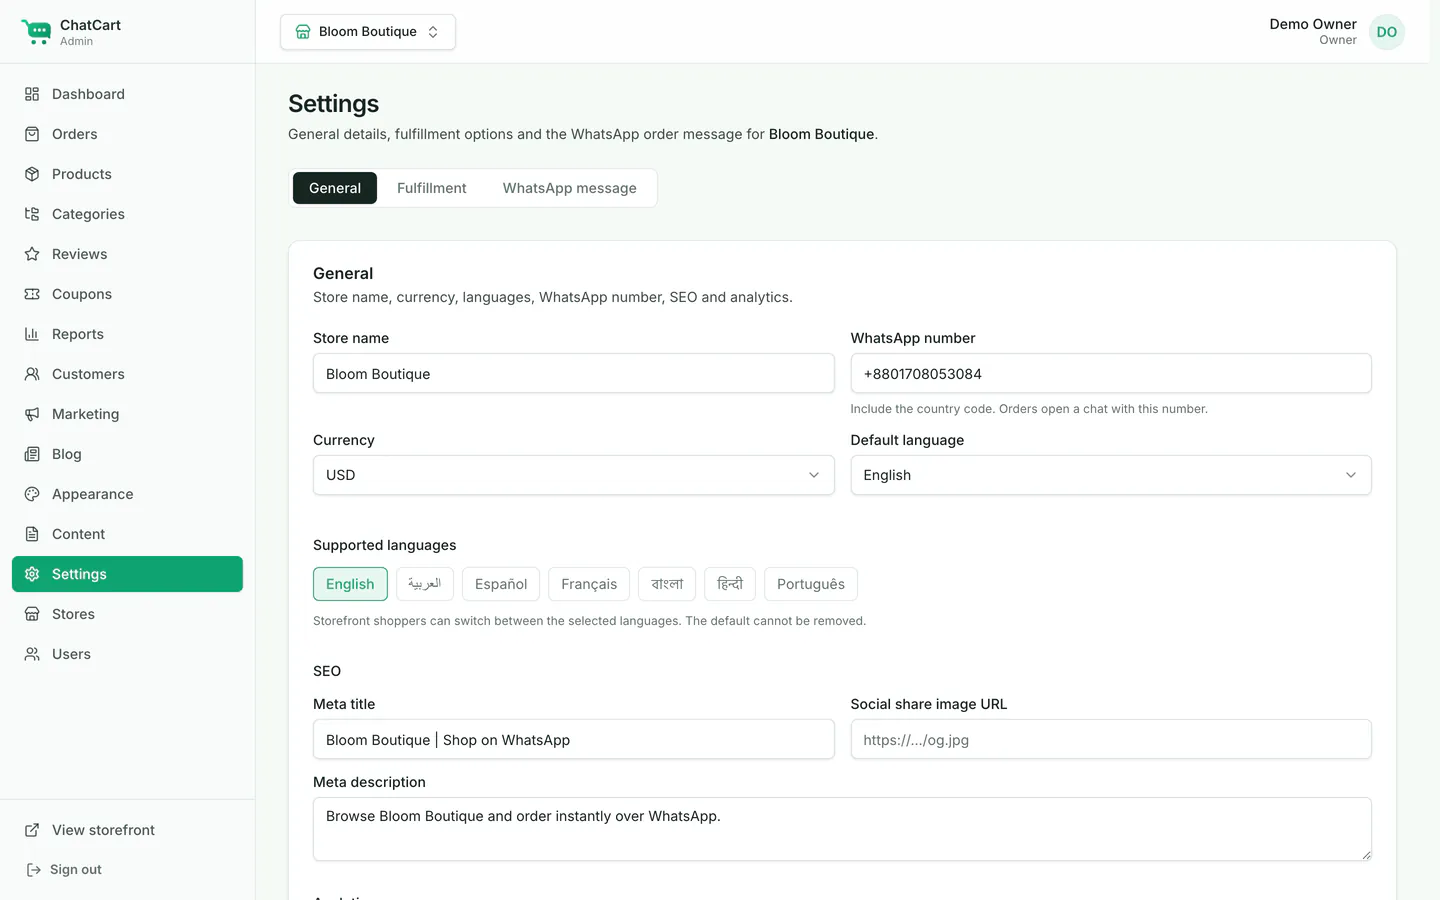
- WhatsApp number: every order of this store opens a chat with this number.
- WhatsApp message tab: the text of the order message. See WhatsApp template.
Place a test order
Open the storefront, add a product to the cart, and go to checkout. Fill in the form and click Order on WhatsApp. WhatsApp (the app or WhatsApp Web) opens with the order message to your number. In the admin, Orders now shows the order as Pending.
If you test from the same WhatsApp account as the store number, WhatsApp opens your own "Message yourself" chat. That is fine for a test.