'%20fill='url(%23cc-green)'%20stroke='url(%23cc-green)'%3e%3cpath%20d='M60%20102h44l70%20112'%20fill='none'%20stroke-width='38'%20stroke-linecap='round'%20stroke-linejoin='round'/%3e%3crect%20x='142'%20y='128'%20width='328'%20height='212'%20rx='76'%20stroke='none'/%3e%3cpath%20d='M388%20300l62-24%202%2072z'%20stroke-width='20'%20stroke-linejoin='round'/%3e%3ccircle%20cx='222'%20cy='410'%20r='32'%20stroke='none'/%3e%3ccircle%20cx='372'%20cy='410'%20r='32'%20stroke='none'/%3e%3c/g%3e%3c/svg%3e) ChatCart
ChatCart
Start here Step 6 of 8
Admin account and demo data
You need at least one owner account to use the admin. There are two ways to get one. Pick the path that fits what you want to do now. You can always add more users later in Admin, Users.
Path A: try it with demo data (npm run seed)
npm run seedThe seed loads a complete demo shop, so you can see every feature:
-
Two stores: Bloom Boutique (the default store, store mode) and
Aroma Café (QR menu mode, at
/s/aroma-cafe). - Categories, products with variants and stock, sample orders, reviews, coupons, blog posts, customers and newsletter subscribers.
-
One owner account. It uses
ADMIN_EMAILandADMIN_PASSWORDfrom.env.localwhen you set them. When they are empty, it creates the demo login below and prints a warning.
| Item | Value |
|---|---|
| Admin login |
[email protected] / ChangeMe123! (only when
ADMIN_EMAIL and ADMIN_PASSWORD are empty)
|
| Customer login |
[email protected] / Password123! (customer accounts
belong to one store)
|
| Coupons |
WELCOME10 (10% off), SAVE5 ($5 off orders of $30 or more),
FREESHIP (free delivery on orders of $50 or more)
|
| WhatsApp numbers |
Placeholders (+15551234567 and +15557654321), unless you set
SEED_WHATSAPP_NUMBER before seeding
|
npm run seed -- --force. This deletes all stores, products, orders, users and
customers in that database. Never use --force on the database of a live shop.
Path B: start clean (npm run create-admin)
Use this for your real shop. It creates one owner account and nothing else. Run it and answer the questions:
npm run create-admin

Admin name [Admin]: Jane
Admin email: [email protected]
Admin password: ********
✅ Created owner admin: [email protected]
   Sign in at /admin/login with this email and password.
The password shows on the screen while you type it. You can also pass everything at once:
npm run create-admin -- --name "Jane" --email [email protected] --password "Your0wnPassword"
Or set ADMIN_NAME, ADMIN_EMAIL and ADMIN_PASSWORD in
.env.local and run npm run create-admin. The rules:
- There is no built-in email or password. You must give both.
- The password needs at least 8 characters.
-
The demo passwords from this guide (
ChangeMe123!andPassword123!) are refused. -
If the email already has an account, nothing is changed. To set a new password for it, add
--reset-password. That also makes it an owner with access to all stores.
npm run create-admin -- --email [email protected] --password "N3wPassword" --reset-passwordAfter Path B: create your first store
A clean install has no store. The storefront shows a page that says No store configured yet with a Go to admin button, and the admin dashboard says No store yet. Create the store:
- Sign in at
/admin. - Click Create a store (or open Stores).
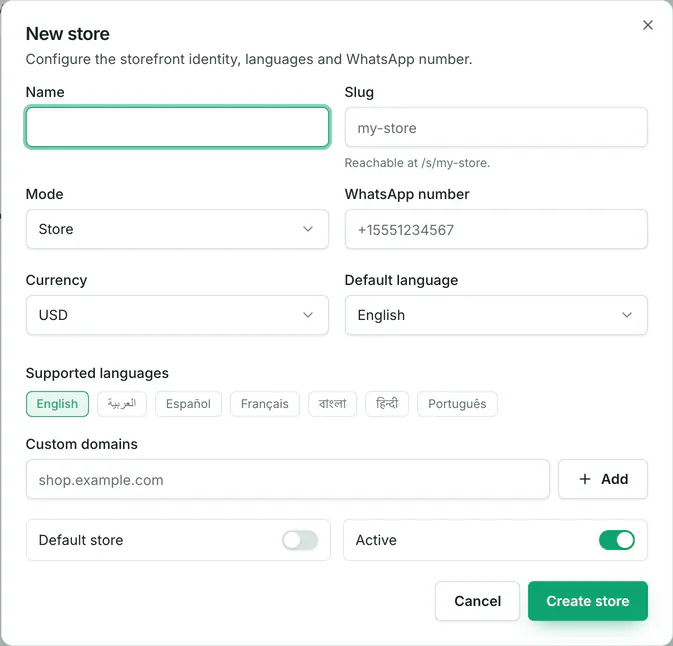
- Click New store and fill in the form below.
- Click Create store. The storefront now shows your store.
-
Name: the store name customers see. The Slug fills in by
itself and gives the store the address
/s/your-slug. - Mode: Store (full shop), QR menu (dine-in ordering) or Link in bio (a short mobile menu).
-
WhatsApp number: where this store's orders go. Use the international format,
for example
+15551234567. - Default store: turn it on for your main store. It is shown on your main address.
- Create store: saves the store.